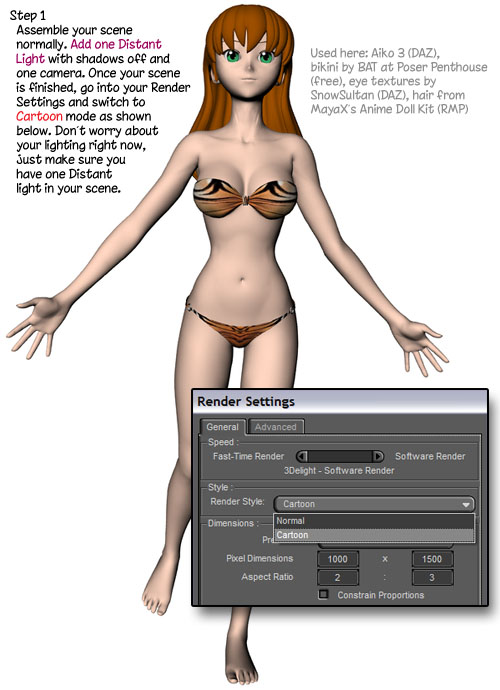
Build your scene normally, but only add one Distant Light and turn it's shadow casting off (default). This basic scene uses DAZ's Aiko 3 with eye textures I created, a free bikini from BAT Lab at Poser Penthouse, and hair included in MayaX's Anime Doll kit. Using this sort of simple non-transmapped hair is important if you want to create more anime-style art, but transmapped hair like Kozaburo's or 3Dream's should work as well. Once you have your scene assembled, switch your render mode to Cartoon (in the Render Options screen) and continue.
We're going to have to make at least two separate renders to get the desired effect, a FLAT colored image with no shadows and little or no detail and a SHADED one, which is grayscale and contains shadows. Later I'll explain how you can combine additional renders for different results, but we're going to keep it simple for now.
|
|
Step 1 - Making the Flat Image
|
|
| |
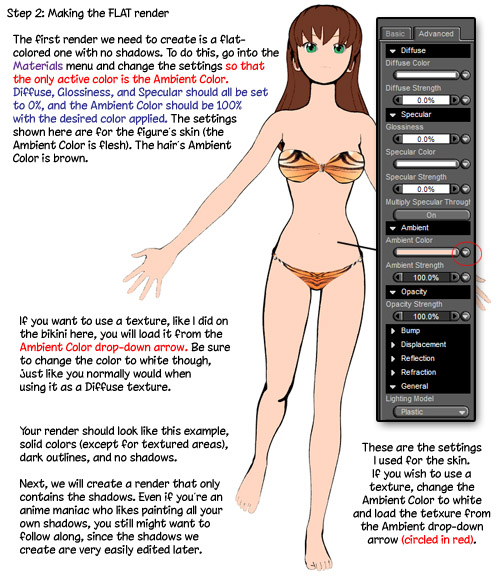 |
To get DAZ Studio to render flat colors with no shading, you will need to change your figure's Material settings to those shown here. The important value is the Ambient; choose the basic color you wish (in this case, flesh for skin, brown for hair, etc.) and set it to 100%. Make sure all other settings, such as Diffuse and Specular, are set to 0%, including for the eye Materials (Eyewhites, Irises, Pupils, and Corneas). If you wish to use a texture, as we did for the bikini and the eyes, load the textures into the Ambient box.
Remember that you can right-click/control-click with the Surface Selection tool to select all surfaces with the same diffuse colour or the same texture, allowing you to make several changes at once. Be careful to check what is being selected though - the lips will usually have the same map and diffuse colour as the face, but you won't want to give them the same ambient colour.
If all the Materials are set correctly, your figures and props will be filled with solid colors when rendered, with no shadows or highlights, like the example above. |
| |
|
Step 2 - Making the Shaded Image
|
|
| |
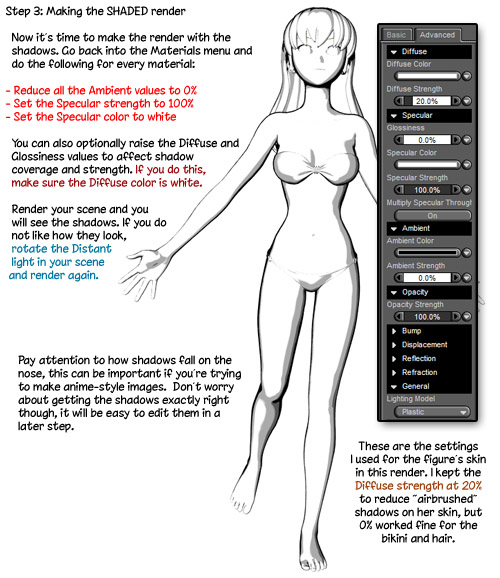 |
Now it's time to make the SHADED render. Make sure you don't move your figure or change your camera settings at all because we're going to be layering these renders in postwork later and they need to match up exactly. Go back into the Materials menu and begin changing the settings to match the ones shown here. This time, the important value is the Specular. Turn all the Ambient values back to 0% (you should not need to change the colors though, dropping the value to 0% is enough) and set all the Specular values to white at 100%. You can affect the amount of shadows cast by raising the Diffuse and Glossiness (adding Diffuse will reduce shadows, raising Glossiness will add more shadows). I find that keeping the Diffuse at around 20% (white) will often eliminate the "airbrushed" shadows created by the cartoon renderer, which you'd probably end up smoothing out in postwork anyway. Make sure you apply these settings to the eyes as well, otherwise they may become darkened later on.
Now your scene should look like the example above when rendered. Your figures will have no color, only gray shadows. Rotate your Distance light if necessary to move the shadows around and keep rendering until you get a satisfactory result. Try not to have too much solid black in the preview unless you want to create a "horror-style" shaded image. |
| |
|
Step 3 - Curving the Shaded Image
|
|
| |
 |
Save your DAZ Studio file if you wish and exit the program, we're done with the 3D portion of this tutorial. Now open your graphics program and load the two renders that you created (the FLAT one and the SHADED one). I will use Photoshop 7 for this example, but any software that uses layers and blending modes (like Multiply, Lighten, etc.) should work.
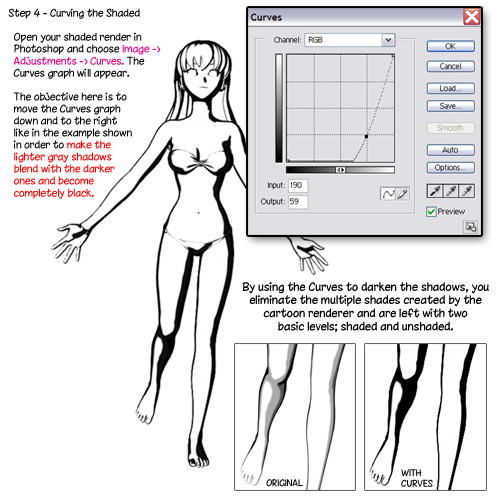
Open the SHADED render and go to Image -> Adjustments -> Curves (or an equivalent tool in your program). The Curves graph will appear as shown. Drag the little handle in the middle down and to the right to make things darker. The objective here is to make the different shaded areas (like the usual light grays, the occasional dark gray, and any black shading) merge into a solid black. When they appear to blend together, apply the Curves as shown. Now you've got a really ugly, dark shaded layer, but that's actually what we want. You'll see why in the next step. |
| |
|
Step 4 - Merging the images
|
|
| |
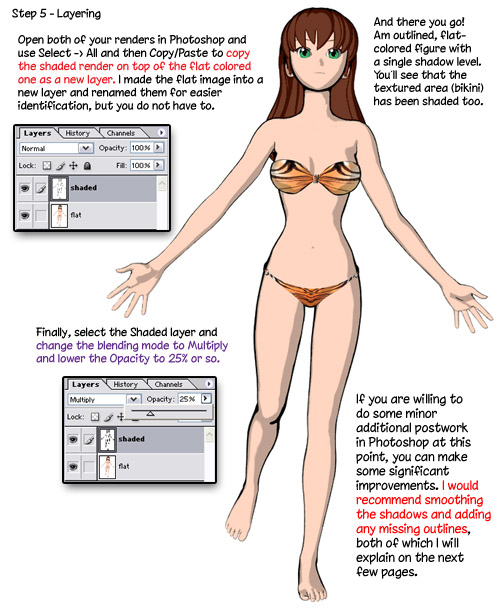 |
With the SHADED render still open, use Select-All, then Copy to the clipboard. Go ahead and open your FLAT render. Paste the image you just copied, and you should have an two-layer image like the one shown above.
Make sure the darkened SHADED layer is still selected, and change it's blending mode to Multiply and lower the Opacity. You will see that now the shading looks much better against the flat colored layer beneath, and you can make the shading darker or lighter just by adjusting the layer's Opacity.
That is the basic concept, but you can get much better results if you're willing to do a little more work in your paint program. I highly recommend smoothing out the shadows, which is quite easy to do now because of them being on an independent layer. I'll show how to do this, as well as adding missing outlines and making airbrushed shadows in the next pages. |
| |
|
Step 5 - Recommended - Smoothing Shadows
|
|
| |
 |
To edit the shadows, simply select the SHADED layer and use a black brush to paint more shadows and a white one to erase them. Smooth out jagged shadows or add competely new ones to give your image a more traditional cel-shaded look. And since the shadows for all objects are on the same layer, you can change them on the clothing and hair too.
If you've gotten this far and decide you don't like where the shadows are at all, it's still easy to completely change them. All you have to do is go back to DAZ Studio and re-render a SHADED image with adjusted lighting. As long as you haven't changed the camera angle or moved the figure, you can just repeat the Curves and layering steps until you're happy with the basic shadow placement.
Next, we'll use a tiny brush to add outlines where the renderer may have missed them. |
| |
|
Step 6 - Recommended - Adding Outlines
|
|
| |
 |
In our image, we see that the cartoon renderer did not add outlines to several areas of our figure. This usually happens on the hands, feet, hair, and the edges of clothing that fall within the borders of the figure. The larger your renders are, the easier it should be to paint these outlines. Just don't make your images TOO big, or it will take a long time to add them.
Add a new layer and begin painting them in with an anti-aliased round brush. I use a dark gray or black, depending on the strength of nearby outlines. You'll probably get best results if your images are big enough to let you use a 2-pixel brush or larger (because you won't get quite as much anti-aliasing or blurring). I had to use a 1-pixel brush here, so your results won't be any worse than what you see here. ;) |
| |
|
Step 7 - Optional - Airbrushed Shadows (step 1)
|
|
| |
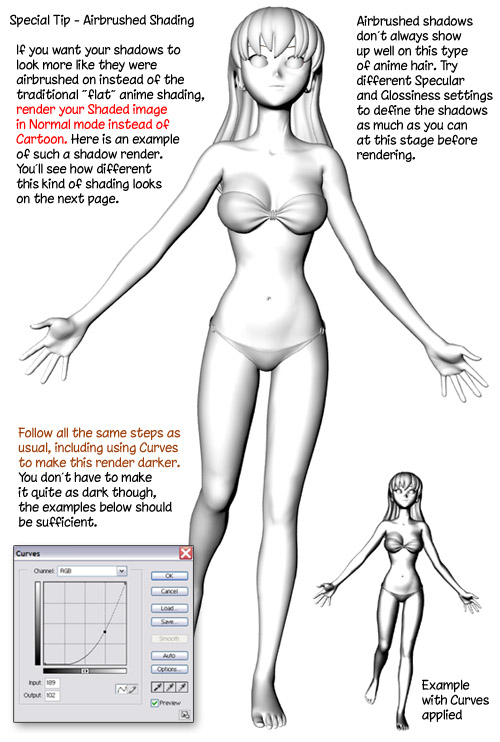 |
| If you don't care for the sharp-edged anime shadows, you can give your figure soft "airbrushed" shading instead by rendering your SHADED image in Normal mode instead of Cartoon. Continue as you normally would, but when it's time to adjust the Curves, don't make the shadows solid black. Use the example above as a guide, and when you layer the renders in the final step, the shadows will retain their softness. |
| |
|
Step 8 - Optional - Airbrushed Shadows (part 2)
|
|
BACK